11.4 Understanding DNS records for Service objects
An important aspect of Kubernetes services is the ability to look them up via DNS. This is something that deserves to be looked at more closely.
You know that a service is assigned an internal cluster IP address that pods can resolve through the cluster DNS. This is because each service gets an A record in DNS (or an AAAA record for IPv6). However, a service also receives an SRV record for each of the ports it makes available.
Let’s take a closer look at these DNS records. First, run a one-off pod like this:
$ kubectl run -it --rm dns-test --image=giantswarm/tiny-tools
/ #
This command runs a pod named dns-test with a container based on the container image giantswarm/tiny-tools. This image contains the host, nslookup, and dig tools that you can use to examine DNS records. When you run the kubectl run command, your terminal will be attached to the shell process running in the container (the -it option does this). When you exit the shell, the pod will be removed (by the --rm option).
11.4.1 Inspecting a service’s A and SRV records in DNS
You start by inspecting the A and SRV records associated with your services.
Looking up a service’s A record
To determine the IP address of the quote service, you run the nslookup command in the shell running in the container of the dns-test pod like so:
/ # nslookup quote
Server:         10.96.0.10
Address:        10.96.0.10#53 //

Name:   quote.kiada.svc.cluster.local
Address: 10.96.161.97
NOTE
You can use dig instead of nslookup, but you must either use the +search option or specify the fully qualified domain name of the service for the DNS lookup to succeed (run either dig +search quote or dig quote.kiada.svc.cluster.local).
Now look up the IP address of the kiada service. Although this service is of type LoadBalancer and thus has both an internal cluster IP and an external IP (that of the load balancer), the DNS returns only the cluster IP. This is to be expected since the DNS server is internal and is only used within the cluster.
Looking up SRV records
A service provides one or more ports. Each port is given an SRV record in DNS. Use the following command to retrieve the SRV records for the kiada service:
/ # nslookup -query=SRV kiada
Server:         10.96.0.10
Address:        10.96.0.10#53 // //

kiada.kiada.svc.cluster.local   service = 0 50 80 kiada.kiada.svc.cluster.local.
kiada.kiada.svc.cluster.local   service = 0 50 443 kiada.kiada.svc.cluster.local.
NOTE
As of this writing, GKE still runs kube-dns instead of CoreDNS. Kube-dns doesn’t support all the DNS queries shown in this section.
A smart client running in a pod could look up the SRV records of a service to find out what ports are provided by the service. If you define the names for those ports in the Service object, they can even be looked up by name. The SRV record has the following form:
_port-name._port-protocol.service-name.namespace.svc.cluster.local
The names of the two ports in the kiada service are http and https, and both define TCP as the protocol. To get the SRV record for the http port, run the following command:
/ # nslookup -query=SRV _http._tcp.kiada
Server:         10.96.0.10
Address:        10.96.0.10#53 //

_http._tcp.kiada.kiada.svc.cluster.local        service = 0 100 80 kiada.kiada.svc.cluster.local.
TIP
To list all services and the ports they expose in the kiada namespace, you can run the command nslookup -query=SRV any.kiada.svc.cluster.local. To list all services in the cluster, use the name any.any.svc.cluster.local.
You’ll probably never need to look for SRV records, but some Internet protocols, such as SIP and XMPP, depend on them to work.
NOTE
Please leave the shell in the dns-test pod running, because you’ll need it in the exercises in the next section when you learn about headless services.
11.4.2 Using headless services to connect to pods directly
Services expose a set of pods at a stable IP address. Each connection to that IP address is forwarded to a random pod or other endpoint that backs the service. Connections to the service are automatically distributed across its endpoints. But what if you want the client to do the load balancing? What if the client needs to decide which pod to connect to? Or what if it needs to connect to all pods that back the service? What if the pods that are part of a service all need to connect directly to each other? Connecting via the service’s cluster IP clearly isn’t the way to do this. What then?
Instead of connecting to the service IP, clients could get the pod IPs from the Kubernetes API, but it’s better to keep them Kubernetes-agnostic and use standard mechanisms like DNS. Fortunately, you can configure the internal DNS to return the pod IPs instead of the service’s cluster IP by creating a headless service.
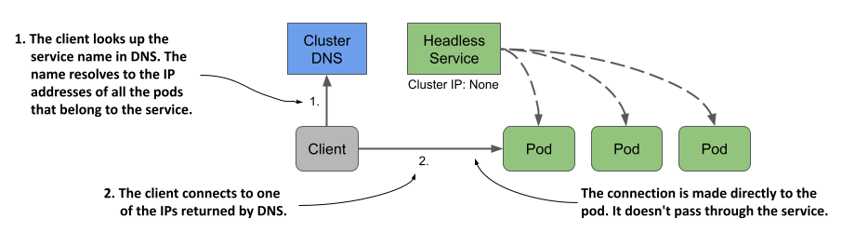
For headless services, the cluster DNS returns not just a single A record pointing to the service’s cluster IP, but multiple A records, one for each pod that’s part of the service. Clients can therefore query the DNS to get the IPs of all the pods in the service. With this information, the client can then connect directly to the pods, as shown in the next figure.
Figure 11.13 With headless services, clients connect directly to the pods
Creating a headless service
To create a headless service, you set the clusterIP field to None. Create another service for the quote pods but make this one headless. The following listing shows its manifest:
Listing 11.7 A headless service
apiVersion: v1
kind: Service
metadata:
  name: quote-headless
spec:
  clusterIP: None
  selector:
    app: quote
  ports:
  - name: http
    port: 80
    targetPort: 80
    protocol: TCP
After you create the service with kubectl apply, you can check it with kubectl get. You’ll see that it has no cluster IP:
$ kubectl get svc quote-headless -o wide
NAME             TYPE        CLUSTER-IP   EXTERNAL-IP   PORT(S)   AGE   SELECTOR
quote-headless   ClusterIP   None         <none>        80/TCP    2m    app=quote
Because the service doesn’t have a cluster IP, the DNS server can’t return it when you try to resolve the service name. Instead, it returns the IP addresses of the pods. Before you continue, list the IPs of the pods that match the service’s label selector as follows:
$ kubectl get po -l app=quote -o wide
NAME           READY   STATUS    RESTARTS   AGE   IP            NODE
quote-canary   2/2     Running   0          3h    10.244.2.9    kind-worker2
quote-001      2/2     Running   0          3h    10.244.2.10   kind-worker2
quote-002      2/2     Running   0          3h    10.244.2.8    kind-worker2
quote-003      2/2     Running   0          3h    10.244.1.10   kind-worker
Note the IP addresses of these pods.
Understanding DNS A records returned for a headless service
To see what the DNS returns when you resolve the service, run the following command in the dns-test pod you created in the previous section:
/ # nslookup quote-headless
Server:         10.96.0.10
Address:        10.96.0.10#53 //

Name:   quote-headless.kiada.svc.cluster.local
Address: 10.244.2.9
Name:   quote-headless.kiada.svc.cluster.local
Address: 10.244.2.8
Name:   quote-headless.kiada.svc.cluster.local
Address: 10.244.2.10
Name:   quote-headless.kiada.svc.cluster.local
Address: 10.244.1.10
The DNS server returns the IP addresses of the four pods that match the service’s label selector. This is different from what DNS returns for regular (non-headless) services such as the quote service, where the name resolves to the cluster IP of the service:
/ # nslookup quote
Server:         10.96.0.10
Address:        10.96.0.10#53 //

Name:   quote.kiada.svc.cluster.local
Address: 10.96.161.97
Understanding how clients use headless services
Clients that wish to connect directly to pods that are part of a service, can do so by retrieving the A (or AAAA) records from the DNS. The client can then connect to one, some, or all the returned IP addresses.
Clients that don’t perform the DNS lookup themselves, can use the service as they’d use a regular, non-headless service. Because the DNS server rotates the list of IP addresses it returns, a client that simply uses the service’s FQDN in the connection URL will get a different pod IP each time. Therefore, client requests are distributed across all pods.
You can try this by sending multiple requests the quote-headless service with curl from the dns-test pod as follows:
/ # while true; do curl http://quote-headless; done
This is the quote service running in pod quote-002
This is the quote service running in pod quote-001
This is the quote service running in pod quote-002
This is the quote service running in pod quote-canary
...
Each request is handled by a different pod, just like when you use the regular service. The difference is that with a headless service you connect directly to the pod IP, while with regular services you connect to the cluster IP of the service, and your connection is forwarded to one of the pods. You can see this by running curl with the --verbose option and examining the IP it connects to:
/ # curl --verbose http://quote-headless
*   Trying 10.244.1.10:80...
* Connected to quote-headless (10.244.1.10) port 80 (#0)
...

/ # curl --verbose http://quote
*   Trying 10.96.161.97:80...
* Connected to quote (10.96.161.97) port 80 (#0)
...
Headless services with no label selector
To conclude this section on headless services, I’d like to mention that services with manually configured endpoints (services without a label selector) can also be headless. If you omit the label selector and set the clusterIP to None, the DNS will return an A/AAAA record for each endpoint, just as it does when the service endpoints are pods. To test this yourself, apply the manifest in the svc.external-service-headless.yaml file and run the following command in the dns-test pod:
/ # nslookup external-service-headless
11.4.3 Creating a CNAME alias for an existing service
In the previous sections, you learned how to create A and AAAA records in the cluster DNS. To do this, you create Service objects that either specify a label selector to find the service endpoints, or you define them manually using the Endpoints and EndpointSlice objects.
There’s also a way to add CNAME records to the cluster DNS. In Kubernetes, you add CNAME records to DNS by creating a Service object, just as you do for A and AAAA records.
NOTE
A CNAME record is a DNS record that maps an alias to an existing DNS name instead of an IP address.
Creating an ExternalName service
To create a service that serves as an alias for an existing service, whether it exists inside or outside the cluster, you create a Service object whose type field is set to ExternalName. The following listing shows an example of this type of service.
Listing 11.8 An ExternalName-type service
apiVersion: v1
kind: Service
metadata:
  name: time-api
spec:
  type: ExternalName
  externalName: worldtimeapi.org
In addition to setting the type to ExternalName, the service manifest must also specify in the externalName field external name to which this service resolves. No Endpoints or EndpointSlice object is required for ExternalName services.
Connecting to an ExternalName service from a pod
After the service is created, pods can connect to the external service using the domain name ·time-api.time-api if they’re in the same namespace as the service) instead of using the actual FQDN of the external service, as shown in the following example:
$ kubectl exec -it kiada-001 -c kiada -- curl http://time-api/api/timezone/CET
esolving ExternalName services in DNS
Because ExternalName services are implemented at the DNS level (only a CNAME record is created for the service), clients don’t connect to the service through the cluster IP, as is the case with non-headless ClusterIP services. They connect directly to the external service. Like headless services, ExternalName services have no cluster IP, as the following output shows:
$ kubectl get svc time-api
NAME       TYPE           CLUSTER-IP   EXTERNAL-IP        PORT(S)   AGE
time-api   ExternalName   <none>       worldtimeapi.org   80/TCP    4m51s
As a final exercise in this section on DNS, you can try resolving the time-api service in the dns-test pod as follows:
/ # nslookup time-api
Server:         10.96.0.10
Address:        10.96.0.10#53 //

time-api.kiada.svc.cluster.local        canonical name = worldtimeapi.org.
Name:   worldtimeapi.org
Address: 213.188.196.246
Name:   worldtimeapi.org
Address: 2a09:8280:1::3:e
You can see that time-api.kiada.svc.cluster.local points to worldtimeapi.org. This concludes this section on DNS records for Kubernetes services. You can now exit the shell in the dns-test pod by typing exit or pressing Control-D. The pod is deleted automatically.